Key Takeaways
- Successful migration requires a structured four‑phase plan—Plan, Design, Implement, Rollout—incorporating stakeholder feedback and mapping use cases instead of matching features point by point.
- Ivanti UEM can be deployed in the cloud, on premise, or in a hybrid environment.
- It supports multiple user‑source integrations, including SCIM, LDAP, and local accounts.
- The solution offers granular admin roles and Spaces for delegated management.
If you have purchased Ivanti UEM and are migrating to it from Microsoft Intune, you as an IT administrator must understand and execute several critical steps to make that transition smoothly.
In this series of blogs, I will be looking from an Intune admin’s perspective at what it takes to migrate from Intune to Ivanti UEM. I will cover practical elements and best practices, translating terminology used across both products to pave the way for a seamless and successful transition.
Like Microsoft, Ivanti has a wide portfolio of products, solutions and licensing bundles. I will only reference capabilities available within our Ivanti Secure UEM Premium package and Mobile Threat Defense. This information will be invaluable in setting up Ivanti UEM to map to the functions you used in Intune.
In assessing your Intune vs. Ivanti setup, first consider where you would like to deploy. Ivanti can deploy a comprehensive UEM solution fully on-premises, fully cloud and hybrid cloud. Functionality among all deployment types is broadly the same, but I will focus on our cloud capabilities with UEM.
Ivanti has the following infrastructure elements to its UEM solution:
- Neurons for UEM
- Connector
- Sentry
- Access
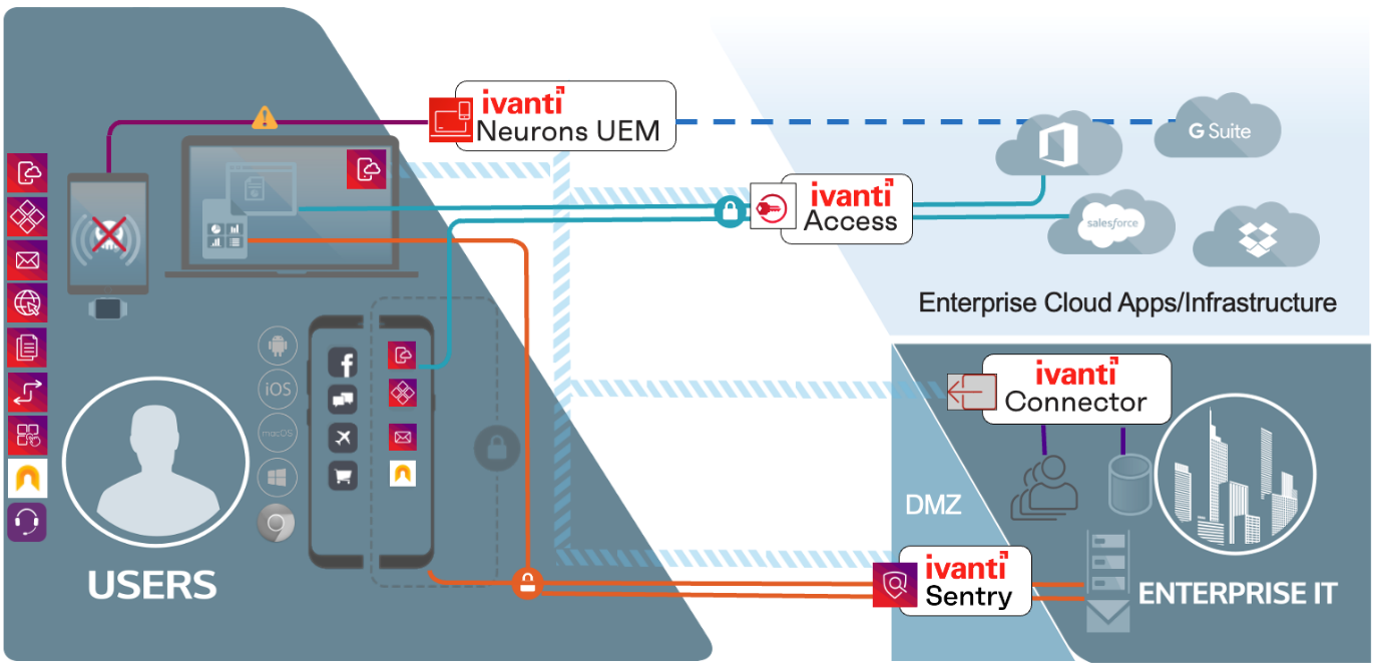
For a detailed breakdown of everything within our UEM solution, from infrastructure to end-user applications, see our product guide here.
From a Microsoft Intune vs. Ivanti perspective, you are immediately able to consolidate and simplify existing infrastructure services you have been using. I will examine Ivanti Access and Sentry products in a future post.
Create a migration plan to onboard users and admins
For a successful Intune migration to Ivanti UEM, creating a thorough Intune migration project plan will minimize disruption for your end users. It will also ease the burden on your help desk. For more support, our Ivanti Support Portal and Ivanti Professional Services team, and our extensive partner network, can guide you.
Most customers can divide the project into four phases:
- Plan
- Design
- Implement
- Rollout
Considerations for steps two, three and four will be covered throughout the series. Every customer is different, and every platform and OS has nuances that I will explain.
The planning phase is the ideal time to examine how you are doing things with UEM today – the good, the bad and things to improve. Do this across the IT organization, looking from the help desk and engaging security teams for their perspective. It is equally important to engage your end users and speak to departments for their feedback. This gives stakeholders a voice on the Intune migration to Ivanti UEM and gets them engaged – and makes IT look like heroes when the project is delivered smoothly.
Ask your user base and stakeholders for feedback in these areas:
End users
- What applications or services are critical to your day-to-day tasks?
- Where are they struggling or getting frustrated using devices?
- Are they happy with the choice of devices available to them?
- Would they like to use their own devices?
- If they could improve one thing about interacting with company devices or systems, what would it be?
Department/business leaders
- What is working today?
- What are some of the security challenges for end-user devices?
- Does the security team have enough visibility and reporting of devices?
- Where are your support tickets coming from?
- What workflows in the business could be improved with changes in device management?
Incorporate information into your Intune migration project plan so your business can execute a seamless transition to Ivanti UEM – and you can show extra benefits from day one.
As well as introducing new functionality for end users, you can deprecate some policies and configurations no longer used, as the operating systems you support have evolved. For example, features that might have been controlled by GPO on a Windows device can now have a modern management API – a much more efficient way of working with Windows devices.
Identifying your use cases and business requirements based on business need and required outcome is critical, as trying to map features line by line between Intune and Ivanti, or any other platform, can quickly become difficult. Each platform might have different naming conventions or ways of working.
Other ways to shape your Intune migration project plan are to:
- Establish and document deployment objectives.
- Analyze existing functionality and use cases and translate them to Ivanti UEM.
- Scope rollout phasing (geography, function).
- Scope user and admin roles/permissions.
- Scope device registration approach.
- Scope policy requirements.
- Review technical and security requirements
Populate your estate
Ivanti UEM has the following options for populating your user estate:
- Local
- LDAP (Active Directory)
- Entra (SCIM)
- Okta (SCIM)
- Roster (Apple Education)
Intune supports either Entra-created users or users synced via Entra Connect from Active Directory. Ivanti Neurons for UEM lets organizations import users from multiple sources; for example, you can use a local account for a single-app kiosk device and a directory account for a knowledge worker.
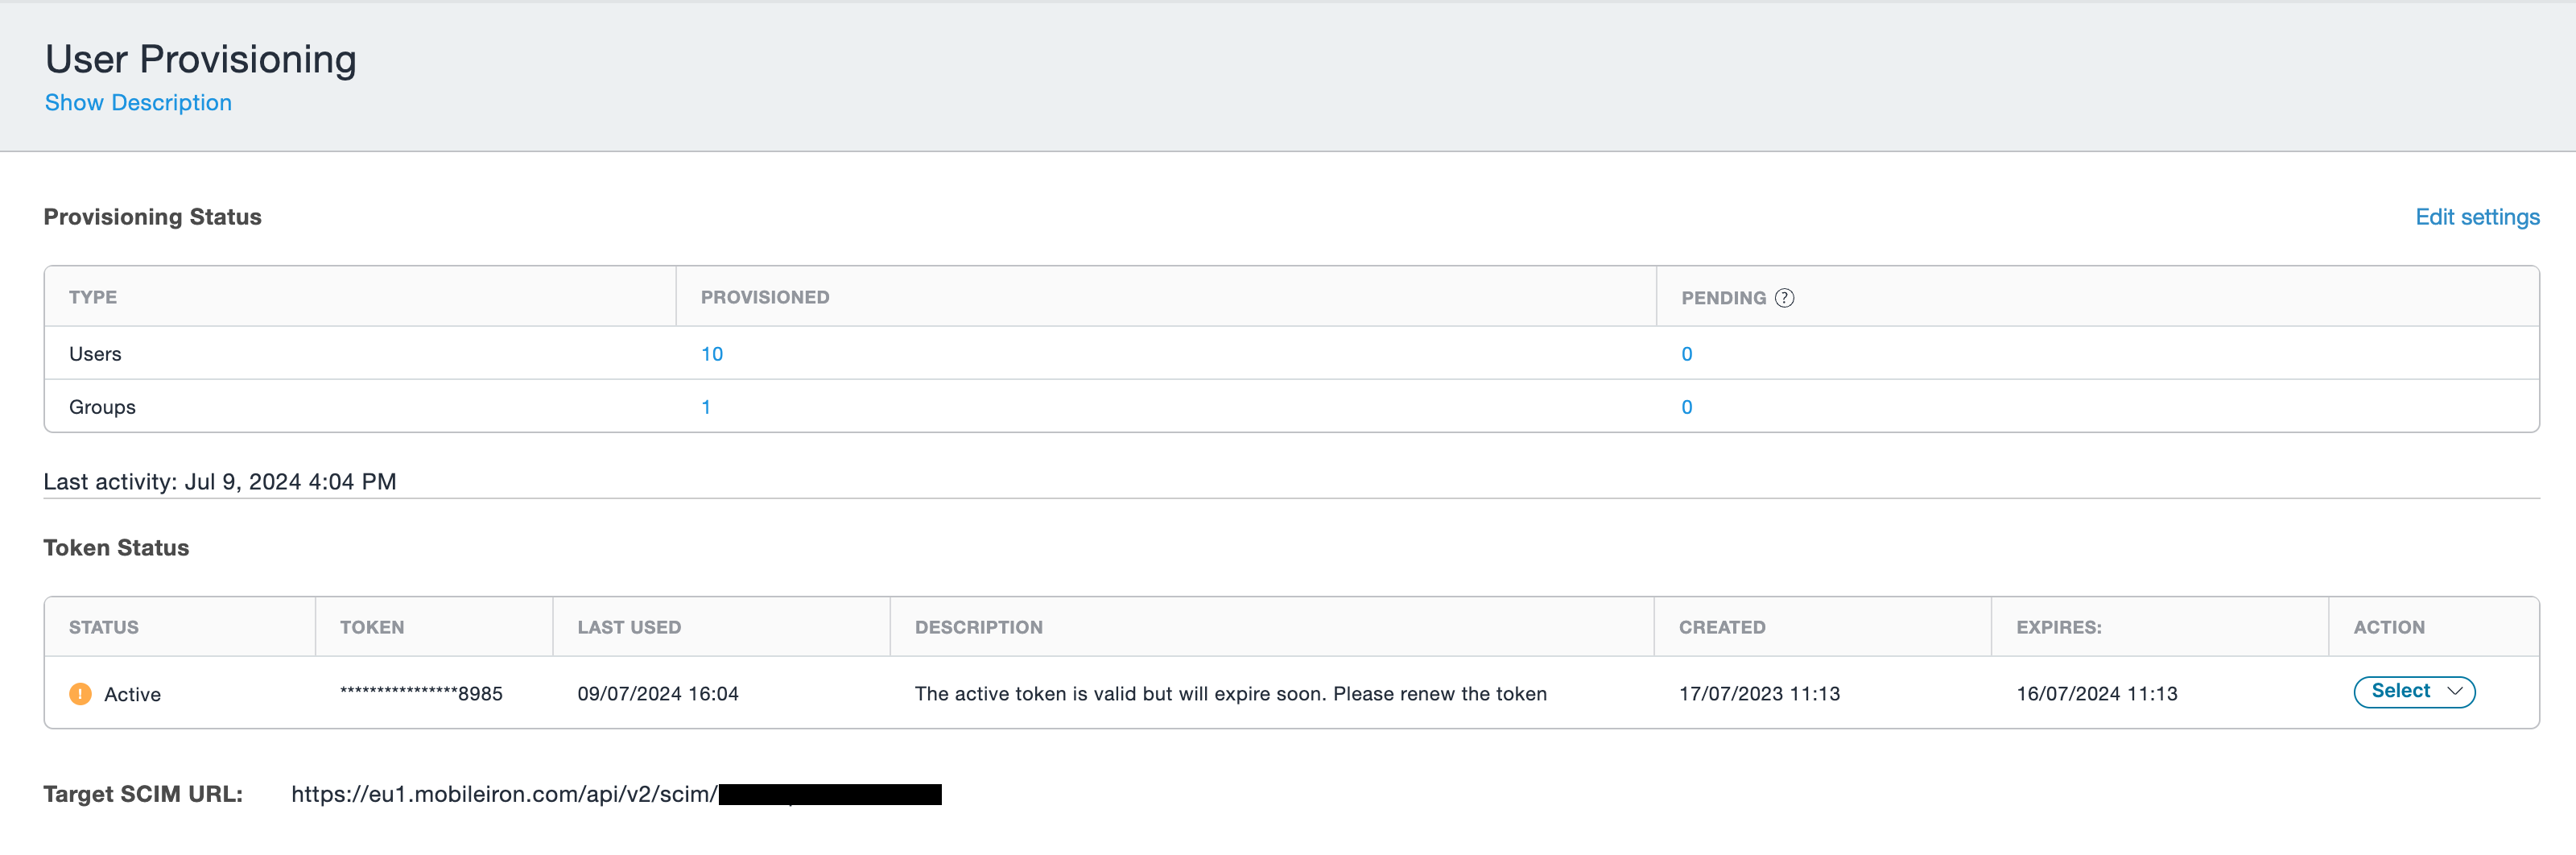
SCIM
Where you will already have either full or hybrid (AD synced) Entra user accounts and groups, you can sync them straight into the platform – removing the requirement for the Connector service if you have no CAs to integrate. After setup, you can see the status of synced users and groups.
As SCIM is a protocol for managing exchange of user identity data and not user authentication, adding your IDP of choice is required when using SCIM. Ivanti supports a range of IDPs out of the box with step-by-step documentation on implementing the IDP, as well as support for “generic” or “other” IDPs.
If your IDP supports SAML, it will more than likely work with our solution. When enabled, SAML becomes the default authentication method for all users regardless of source; add exceptions for local users as required.
LDAP
To connect to an LDAP or Microsoft AD server you must install a Connector Server. This can be installed either in AWS or on a virtual machine on-premises, and the Connector service can be obtained from the portal. After deploying Connector, an LDAP server can be added. LDAPS is supported and preferred where possible to increase security.
After configuring your LDAP service, the status page will show status and sync information. IDP integration is not required when using LDAP; users will be authenticated against the directory without requiring passwords be synced to Ivanti UEM.
Local Users
Local users can be created on an ad-hoc basis or with bulk csv upload using the template downloaded from the portal. This is similar to creating users in Entra. Additionally, local accounts can be created for API functions when connecting to services outside Ivanti UEM. As you can see in the screenshot from my lab environment, I have three sources of users working side by side:
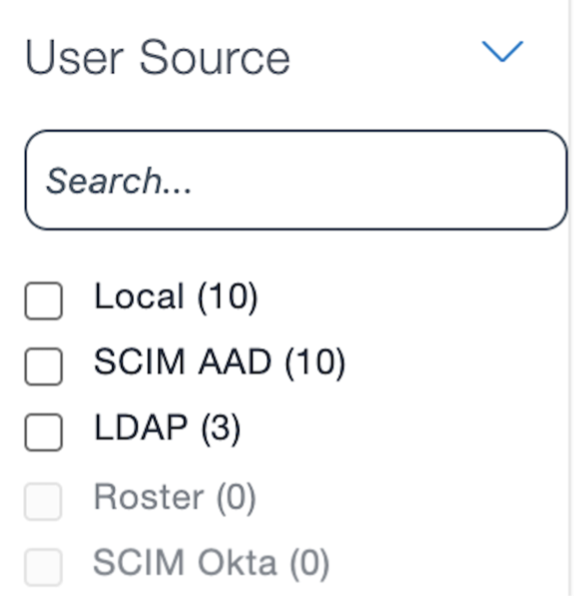
It might be wise to map your use cases across all platforms and identify what user type to use for the best security and user experience.
In addition to supporting users from multiple sources, our platform also supports user groups from multiple sources.
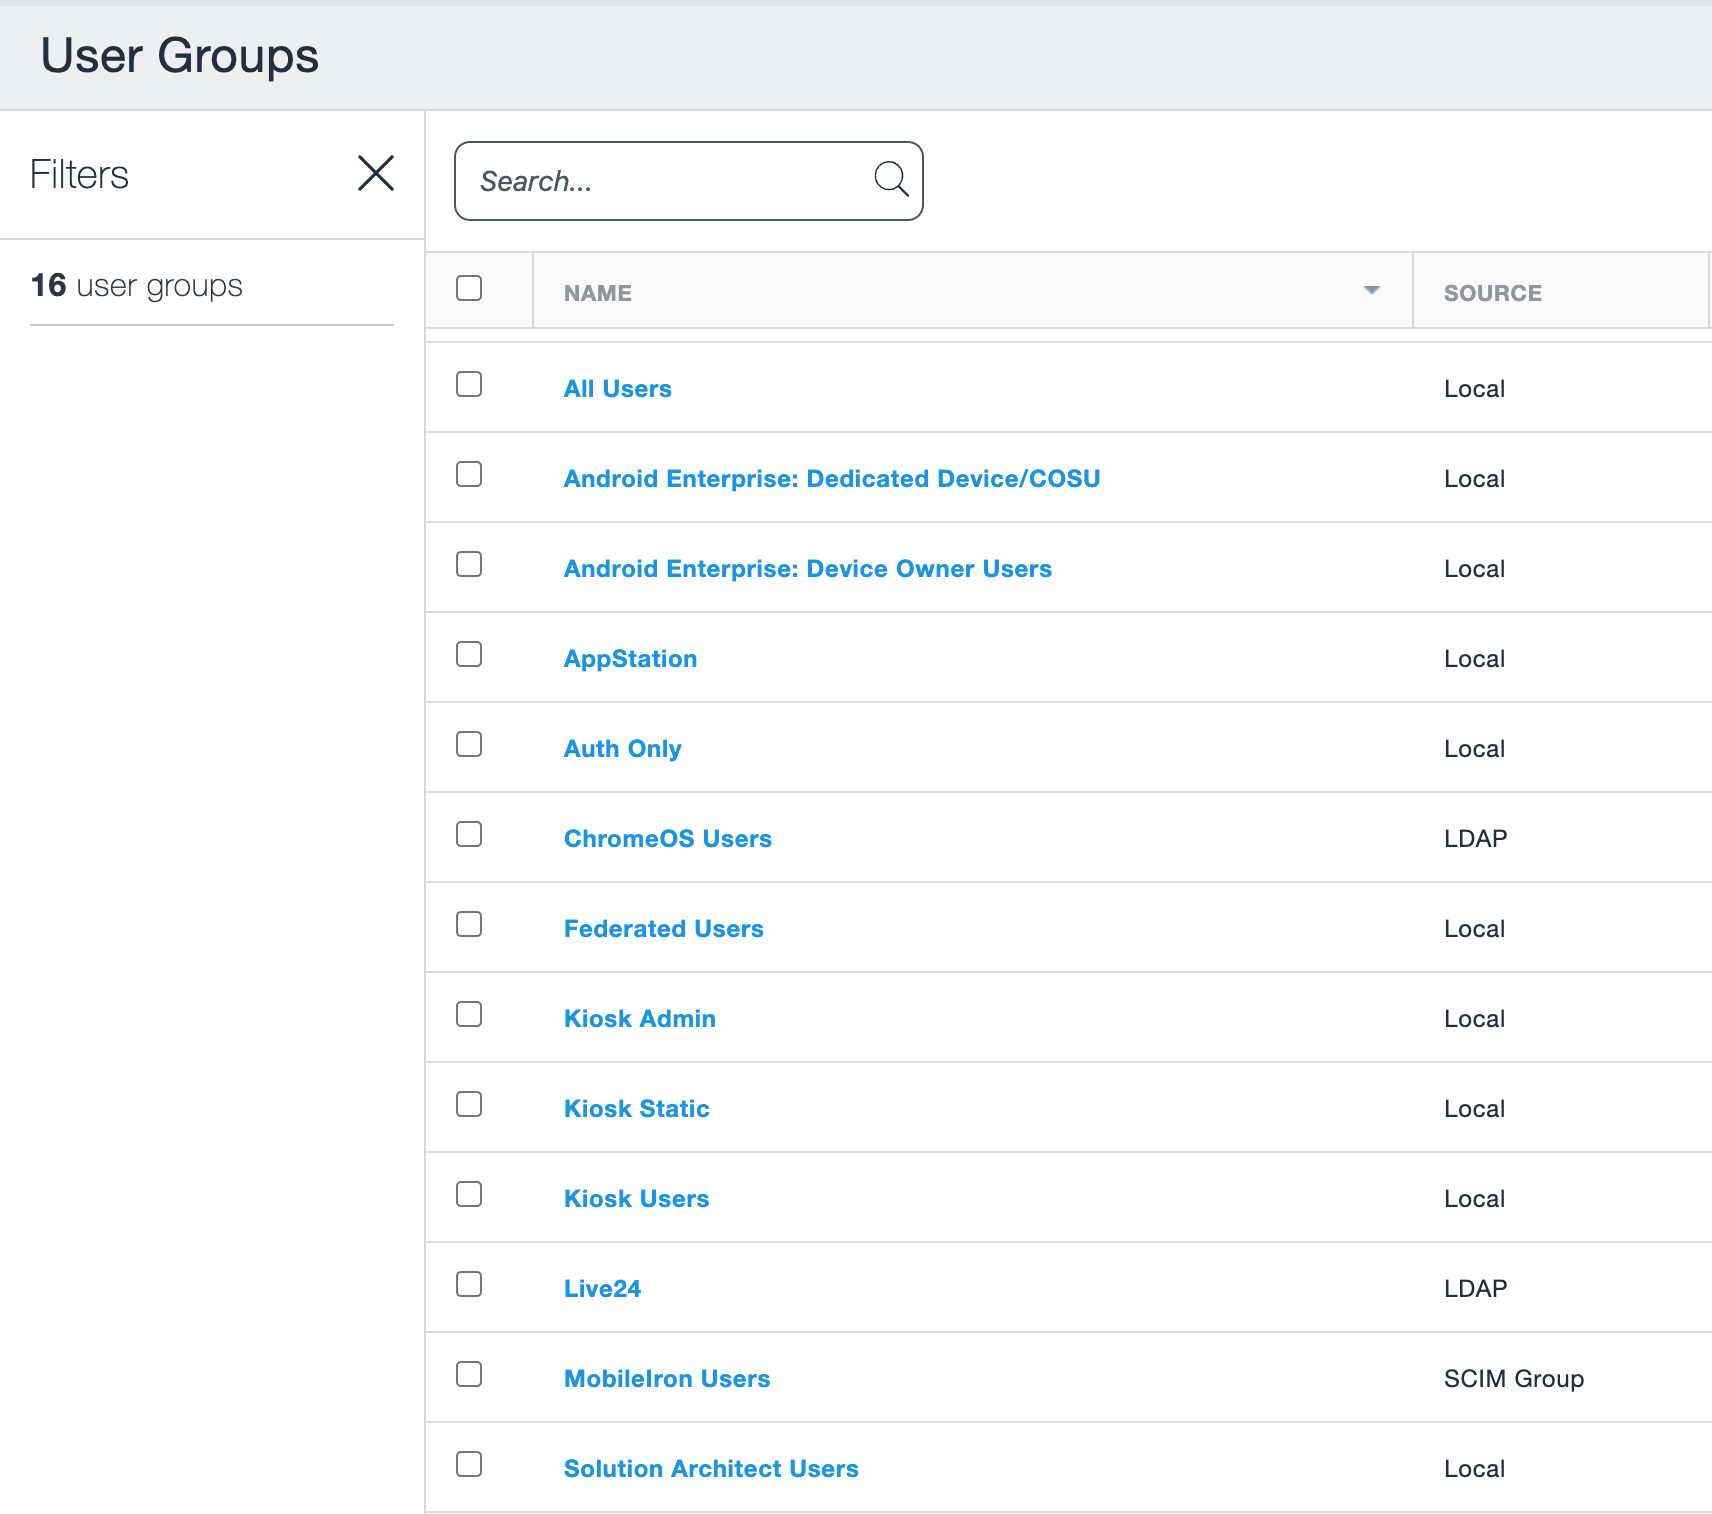
These user groups can be used for assigning policies, configurations, applications and enrollment policies – almost anything that must be assigned to users. When creating local user groups, use our advanced search and filtering capability to create a local user group based on any combination of user information, including custom attributes from LDAP/Entra or locally created entities.
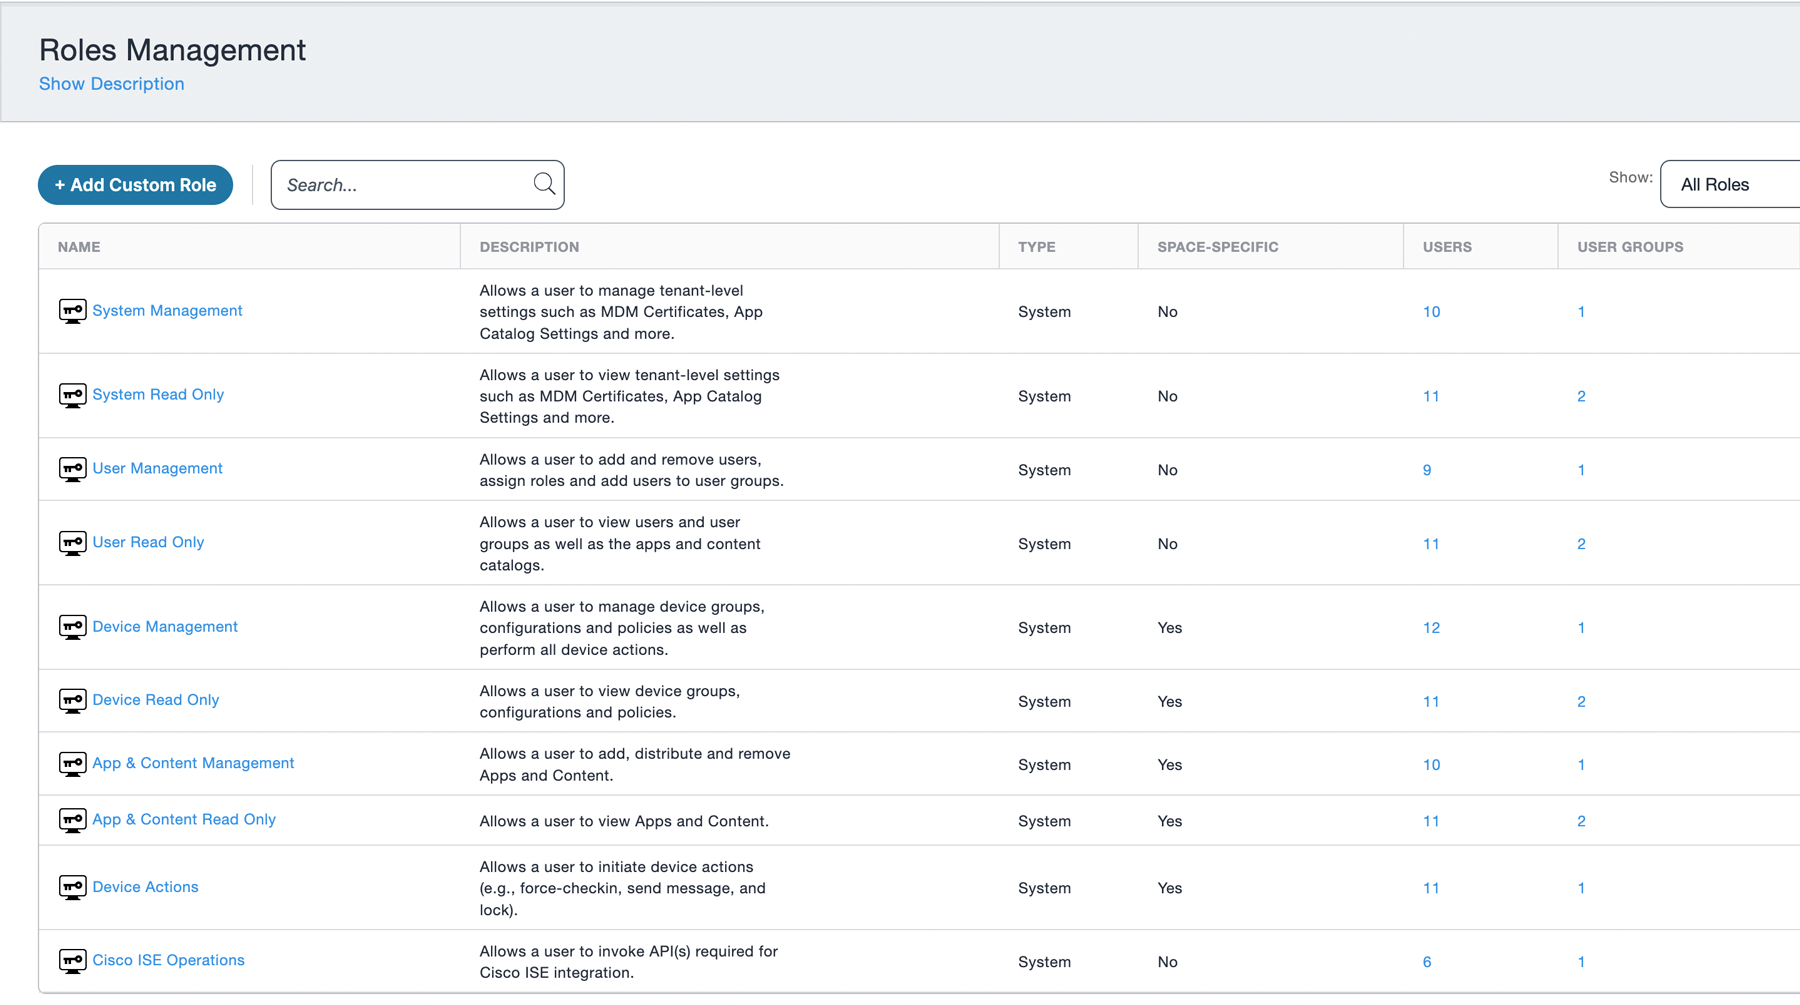
Administrators
Ivanti UEM features granular administration roles and capabilities. Administrator roles can be bulk assigned against user groups or individually to unique administrators. There are over 20 preconfigured admin roles and the ability to create custom roles.
Broadly speaking, there are similar concepts with admin roles across Ivanti and Intune, with capabilities for View Only through to Full/Global Administrator level.
 Ivanti helps organizations with large or complex user estates or geographical considerations with Spaces. Spaces separate an Ivanti Neurons for MDM system into independently managed entities for delegated administration.
Spaces can be created to reflect an organizational hierarchy. Ivanti Neurons for MDM supports single-level delegation with a central management entity called a Default Space, and subordinate management entities called Delegated Spaces. This is similar to the Scope Tags capability in Intune but isn’t limited to Security Groups synced within the platform.
Organizations might have local IT departments that manage a certain set of devices – for example, U.S.-based devices, or just Windows devices or Android – and don't need to see other devices. Spaces can have admins assigned to reflect your requirements.
Next time, we’ll look at securing your device connectivity to on-premises and cloud infrastructure, ensuring the security of your data from source to device.
